There are many ways to send out email invitations, but I’d like to show you how you can create (what i consider to be) the perfect email invitation. It works in all email clients, makes engagement super-easy and allows you to collect RSVP data in one click.
Traditionally sending out email invitations has had some limitations. If you’re in a business environment, you’d typically send out an email invite via Outlook. Great if you’re sending an internal message, but these emails cannot always be read by other email clients. In addition to this, this type of email is only good for sending in small batches, and certainly can’t be used to send to a large list of clients e.g. for a conference.
One of the main benefits of an Outlook style invite is the ability to collect RSVP data. Each recipient can accept or decline the invitation, providing the host with instant feedback on attendance figures. This is a great feature, and just goes to show how powerful email can be when organising an event.
What we’re going to do is take this concept and make it work on a much larger scale. Together we’ll create an attractive email invite that not only works in any email client, but can also collect that all important RSVP data.
Easy-ESPeasy
The aim of this invite is to send to a large amount of subscribers, so Outlook or Gmail just ain’t gonna cut it I’m afraid! You’re going to need an ESP (Email Service Provider – Such as us, fancy that!) to send your invite for a couple of reasons. First off, the aforementioned ability to send to a large number of subscribers and secondly we’ll be using some fancy personalisation, notification and reporting tools to manage our RSVP collection.
Design
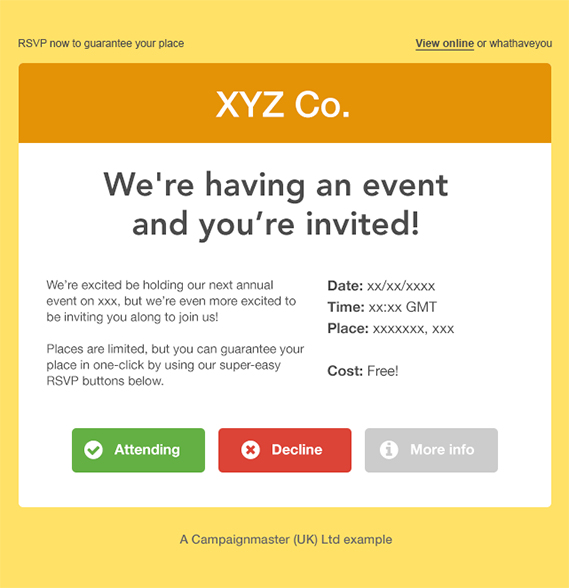
Nothing gets engagement off to a better start than a short, sweet email with clear calls-to-action. And as such, this is how our perfect invite email will be designed. The main design elements will be our title, heading, event information and all important RSVP area. Below is an example of a simple event invite.

RéPondez S’Il Vous PlaîT
Now for the clever part. Using the reporting features your ESP provides, you can track each of the RSVP buttons and monitor how subscribers have responded to your invitation. Link each button off to a landing page confirming the subscribers choice, and if you really want to go the extra mile, setup a triggered confirmation email confirming their selection too. You could even setup two notification emails, one for the subscriber and one for yourself or your events team.
If you need more information from your guests, your landing page is the perfect place to insert a form. Here you can request additional information such as meal choices or +1’s.
“But what if a subscriber clicks clicks on both buttons?!?” If your ESP allows it, you can setup an email database field (e.g. ‘attending’) that is updated to ‘Attending’/‘Declined’ depending on which button is clicked (we call these click-through rules). This way, the field will only display the most up-to-date response from your subscribers.
Add to Calendar
An optional extra – To help subscribers remember your event, you can provide a link to an .ics file so they can add it to their calendars. However, keep in mind this kind of file does not work everywhere, and needs to be downloaded and then opened before a subscriber is prompted to add the event to their calendar.
Need a Little Help?
If you’re a Campaignmaster user and need a little help setting up rules or notifications, our support team can point you in the right direction.
If you want, we can even take on the whole job for you. Get in touch with your account manager on +44 (0)208 515 7080 to get a quote.
That’s a Wrap
And there we have it! Our perfect email invitation with universal one-click RSVP and email notifications. I think my favourite thing about this type of invitation is how easy it is for a subscriber to engage with it. There are no hoops to jump through, and the whole thing can be managed entirely from within the inbox.


